
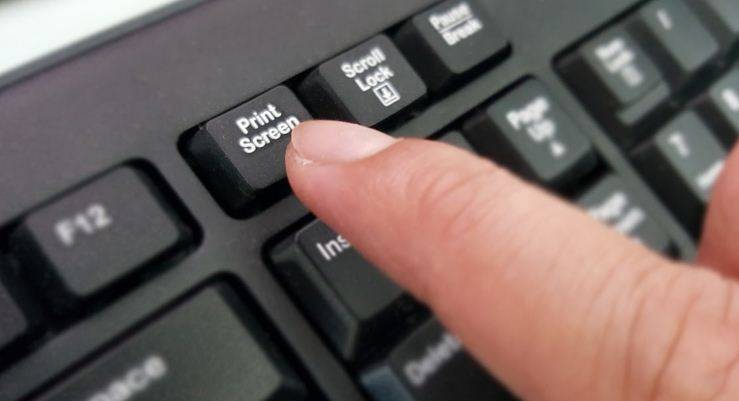
Are you having problems with your print screeprint screen on dell laptop not working? You’ve arrived at the correct location. Many consumers are irritated by this sudden occurrence. It may appear that changing the keyboard is all that is required, but this is not always the case. One of the easiest methods to take a screen shot on dell laptop on Windows is to use the print screen on dell laptop (PrtScr) key. How to print screen on dell laptop? There are numerous remedies you may try if your print screen on dell laptop key has suddenly stopped working. It’s possible that your Print Screen key has stopped working due to a hardware issue, such as a problem with your keyboard.
You’ll need to replace your keyboard if this is the case. Despite the fact that the print screen on dell laptop button and function appear to be small, many of us utilize them. We utilize the Print Src button on our laptops whenever we need to capture a picture. There is a slew of additional difficulties that can cause the print screen on dell laptops to cease working, luckily (or sadly). Let’s take a look at those problems and how to address them. Copying the screen to your clipboard and pasting it anywhere is simple.
12 Fixes For Print Screen on Dell Laptop Not Working in 2022
Many users use it to take screen shot on dell laptop of their screens and then paste them into Paint to save an image. How to print screen on dell laptop? With this advice, you’ll be able to figure out why the print screen on dell laptop button isn’t working. In addition, based on the sort of situation you’re dealing with, you’ll discover how to tackle it. This is your one-stop shop for troubles, with hand-picked solutions. Let’s start by looking at the possibilities, which range from workarounds to comprehensive fixes:
The Print screen on dell laptop button may not work for a variety of reasons:
- It’s possible that it’s a hardware issue.
- Examine the USB or PS2 cable connections.
- Check to see if your driver supports it.
- Check for batteries and other components if you’re using a Bluetooth keyboard.
- Make sure the keyboard hasn’t been physically damaged in any way.
- This includes any spills or liquid damage caused by water or other liquids.
- It’s possible that you’re missing out on some critical Windows 10 updates.
- It’s worth a check to see whether the current or older drivers are causing the problem.
- Check to see if you’re using the right hotkeys for your laptop or computer.
- HP, Lenovo, Dell, Toshiba, and other manufacturers frequently use various shortcut keys.
- Check to check whether a third-party program is the source of the issue.
- You can run into a similar problem if you use third-party screenshot capture software.
- Examine your computer for viruses and malware.
If you use cloud storage, that location is also worth seeing. Below you’ll discover answers and alternative resources for all of these issues. Remember that if none of these suggestions work, you may need to reinstall Windows.
1. Stop A Few Background Apps
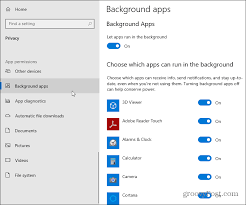
Some parts of your computer may prohibit you from taking screenshots. You may be unable to take screenshots if you have background programs running, such as OneDrive or Dropbox. Third-party screen capture applications like Snippet Tool or Prntsrc are also affected. The majority of these apps may feature a built-in override feature.
As a result, it’s a good idea to start closing all of your apps. Step through each program one at a time, checking the Print Screen on Dell Laptop button each time. This will allow you to determine if a background program is to blame for the function’s failure. If you discover the offending app, you have the option of keeping it closed or completely uninstalling it. It’s a good idea to try running your computer in Safe Mode to check whether the Print Screen function works. If that’s the case, you may restart and repeat the procedures until you locate the app that’s causing the issue.
- Use the CTRL + Shift + ESC shortcut.
- Now, right-click on the applications and select End Task from the Task Manager. Only do this for non-essential programs.
You might also attempt a clean boot of the computer. It’s also known as the previously described Safe-Mode. Simply follow the instructions below. Press Windows + R to type MSConfig.
Enter the code.
- The System Configuration window will appear.
- Select the Selective Startup option under the General tab.
- In the section, uncheck the “Load Startup Items” box.
- Make sure ‘Load System Services’ is turned on.
- Go to the Services tab and uncheck the box that says “Hide All Microsoft Services.”
- Following that, there are a few services on the list that aren’t Microsoft Essentials.
- Select Disable All from the drop-down menu.
- Then choose open.
- Restart the computer now.
- Then, to test if it’s functioning, use the Print Screen on Dell Laptop button.
- Also, see 15 Quick Fixes:
- The Black Screen in OBS Game Capture
- If it works, the issue is most likely due to a program or tool.
2. Check The Screenshot Save Location
Third-party programs, particularly Cloud Storage, have a tendency to save screenshots independently. Other programs, such as Snippet or PrntSrc, will frequently save them to your database. How to print screen on a dell laptop? As a result, you might not be able to use the Print Screen on Dell Laptop feature as well as you would want. Check to see whether you have any cloud services or third-party screen capture tools installed. Check to see if you’re storing screenshots there by accident. You may also go to your pictures folder by going to ‘This PC’ or ‘Documents’. Check to see whether there is a screenshot folder and if it contains your screenshots. One of the easiest methods is to take a screenshot on dell laptop on Windows.
3. Check The Function Key And Keyboard’s Keys
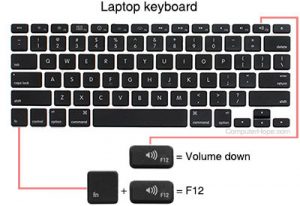
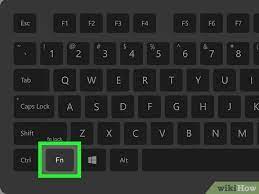
It’s a good idea to check for hardware issues before moving on to another option. If you’re typing on your laptop’s keyboard, consider using the Fn key, sometimes known as the function key. Many print src buttons only operate with the Fn key, depending on the manufacturer. It’s the same as copying something with CTRL + C. So go ahead and give it a go. In the laptop’s settings, you may adjust the function key’s function.
Meanwhile, if you’re using a computer keyboard, experiment with other shortcut keys. Use the notepad or word app if it doesn’t work. In that window, press each key on your keyboard one by one. Examine each key to check if it functions properly. It should be OK if it is working. Otherwise, your keyboard is the source of the problem. It’s possible that you’ll require a replacement.
Here are some quick tips:
- Fn + Print Screen is a keyboard shortcut.
- Screen Print + Windows Key
- Print Screen (Alt + P)
- SCREENS WITH CTRL + PRINTPrint Screens (Ctrl + P)
4. Update The Drivers For Keyboard
Many Windows 10 problems may be traced back to driver upgrades. Start with drivers if you’ve tried other diagnoses and still can’t figure out what’s wrong. How to print screen on a dell laptop? Drivers that are out of date or that have been upgraded can sometimes result in a misunderstanding between the system and the hardware. Make sure you’re using the keyboard’s particular drivers from the manufacturer.
In other words, look into the keyboard’s maker. After that, go to their official website and download the driver. These are the drivers that are the most compatible. However, the keyboard driver may be updated, disabled, or rolled back. How? print screen dell laptop?
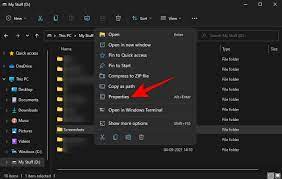
Take the following steps:
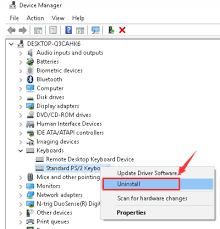
- Right-click the window’s icon in the lower-left corner and choose Properties. From the drop-down menu, choose Device Manager.
- After that, expand the Keyboards section. You might wish to right-click each driver if there are too many.
- Then navigate to the properties section.
- A driver tab can be found there. Select it by clicking on it.
- There are several commands accessible on the driver’s cab. There is a driver update option. To discover and download drivers, click on it and pick the automated option.
- If it doesn’t work, you may try the manual option, but you’ll need to first download the necessary driver files.
- Try the roll-back driver option if the drivers are already up to date.
- It may work in certain cases since your machine isn’t advanced enough to support the newest drivers.
- You may also try uninstalling the driver and restarting the computer.
- Click ‘Scan for Hardware Changes’ after that. The necessary drivers will be downloaded by the computer.
- Drivers are disabled and enabled in the same way that the device is restarted.
- It is possible to do so in order to relaunch the software driver. Use the Hardware Troubleshooter
5. Use The Troubleshooter For Hardware
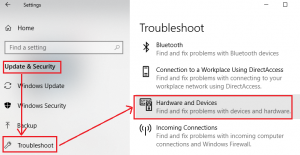
If you’ve tried everything else and still haven’t had any luck, it’s time to use the troubleshooter. The troubleshoot option in Windows is useful for resolving common issues. The built-in troubleshooting tools can be quite useful to you: Go to the bottom of the page and type Control Panel into the search field. Look for the Troubleshooter in the Control Panel.
- As a consequence, you’ll get Troubleshooting. Find the Hardware and Sound Troubleshooter by clicking on it.
- The keyboard may be found on the list if you scroll down.
- Select ‘Run This Troubleshooter’ by clicking on it. All you have to do now is follow the on-screen prompts.
- Check to see whether the keyboard is working properly once you’ve completed the instructions. Also, see 15 Ways To Fix “This App Can’t Run On Your PC” Problems.
- Check to see whether the Print Screen on Dell Laptop key is working. If not, you might try some of the other options listed below.
6. Use The On-Screen Keyboard
This is a fantastic solution as well. It’s worth trying the on-screen keyboard if you haven’t been able to solve the problem thus far. You can use this option if you can’t afford to buy a new keyboard. How? print screen dell laptop? It’s only a short-term fix, not a long-term one. Therefore, bear it in mind. One of the easiest methods is to take a screenshot on dell laptop on Windows.
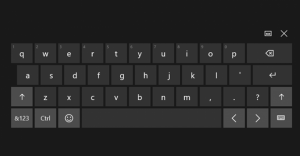
While using the external keyboard, you may still use the on-screen keyboard. All you have to do is use your mouse to click on specific buttons. To use the On-Screen Keyboard, type ‘On-Screen Keyboard’ into the Search Bar below.
- It will display the outcome.
- To start it, simply click on it.
- As you can see, it now closely resembles the original keyboard.
- You may use it with a variety of commands.
- Using the options button will lead you to different settings.
- As a result, you may personalize it.
7. Use The Game Bar To Capture Screenshots
You might also use the Game Bar as a workaround. For Windows 10 users, it’s a built-in function. Many gamers and users use it to record gaming videos and images on Windows 10. You may test it out if you wish to record your screen or take pictures:
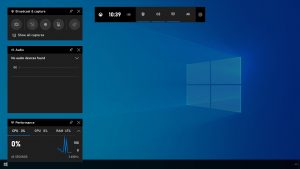
- To access the game bar, press Windows Key + G. You’ll find a snapshot option, sometimes known as screen capture, in the top-left collection of tools.
- Select it by clicking on it. The snapshot will be saved after you click it.
- The following is the address: Username > User > Videos > Captures > This PC > Local Disk C > Username > User > Videos > Captures
- It’s a useful tool to have on hand if you’ve exhausted all other options for taking screenshots on your Windows 10 PC.
8. Check For The Updates For The Operating System
There’s a chance you’ve had a problem with your updates. Getting incorrect or malfunctioning updates might result in a variety of issues. It might be as simple as the Print Screen on Dell Laptop not working. So, if you like, you may look into this remedy since it may be able to assist you in resolving the issue.
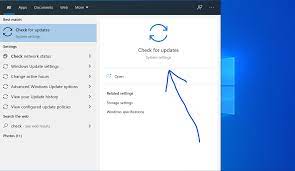
- Open the Settings by pressing the Windows + I keys together.
- The ‘Update & Security option may be found there.
- Select it by clicking on it.
- Click ‘Check For Updates’ under Updates.
- Allow it to install the updates automatically after that.
- If this works, that’s fantastic.
- Otherwise, go to the update history page if you’ve previously updated.
- Look for a newer version of the program as the Print Screen on Dell Laptop button stopped working.
- If there is an entry, select to remove the update by clicking on it.
- Your computer will reboot. However, you may now check to verify if the print screen key is operational.
- If it is, that is fantastic.
- But if the print screen key keeps not working, you can reinstall the latest updates.
9. Check The F-Lock Key
The F-lock key is found on many m dern keyboards. It’s accessible on external keyboards with F1 to F12 keys that can be locked. Some people like it since they don’t want to accidentally activate certain functionalities. The F-lock key toggle allows the F1 through F12 keys to perform their intended functionality. After all, multimedia keyboards have extra features like the ability to mute, change the volume, and so on. As a result, it facilitates the use of the default F key functionalities.
- The Fn (function key) on most computers and keyboards is designed for this purpose.
- However, it’s conceivable that you have an extra F-lock key.
- It may limit your ability to take screenshots.
- As a result, it’s worth double-checking and turning on or off.
10. Check The OneDrive Settings
As previously stated, there is a chance that the photographs will be saved on your OneDrive. This might also happen if you use any other cloud storage application or service. As a result, it is prudent to gain access to their settings. We’ll go over OneDrive’s settings because it’s the default cloud storage.
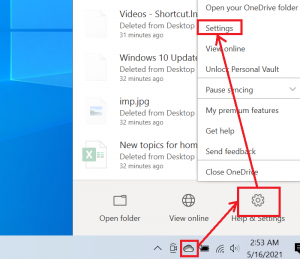
Check the settings of any additional cloud storage you may have. Go to the Taskbar, which is located in the bottom right corner of the screen. Right-click on the OneDrive icon to open it. Go to the Backup option in the settings menu.
- ‘Automatically Save Screenshots I Capture To OneDrive’ is found there.
- If it’s checked, uncheck it now.
- Alternatively, try the opposite way around to see whether the Print Screen Button is active.
- Don’t forget to leave and save your settings.
- Check your print screen button now to determine whether it’s working properly.
11. Try The Registry Editor Fix
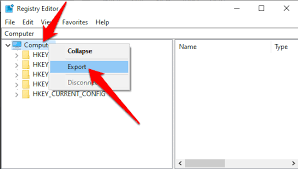
If none of the above alternatives worked, you may be able to address the problem using the Registry Editor. Modifying the registration now has the potential to have a good or negative influence. Make a system backup, a restore point, and other precautions before doing them. If you’ve exhausted all other options for locating the Print Screen button, this should be the last step. Type Regedit into the Windows + R keyboard shortcut. To run as an administrator, press Shift + Enter. If you have specified a password as an administrator, it will prompt you for it. Proceed once you’ve given it admin authority.
Go to the File menu and type anything in the search field. You may type Computer/HKEY_CURRENT_USER/Software/Microsoft/Windows/CurrentVersion/Explorer in the command line directory. A file called “ScreenshotIndex” can be found there. It should be on the panel’s right side. If you still can’t find the file, right-click on the panel and choose DWORD from the drop-down menu (32-bit). Under the ‘New’ option, it should be a value. Now, give it the name ‘ScreenshotIndex’ and double-click it when it has been created. Set the Hexadecimal value data to 4 in the Hexadecimal value data.
After that, browse to the following folder:
- Look for and open a file named B7BEDE81-DF94-4682-A7D8-57A52620B86F.
- Look at the valuable data it has.
- Copy and paste the following: % USERPROFILE % PICTURESCREENSHOOTS
- If you can’t find one, create a String Value File using the New option.
- Additionally, you have the option to modify the value (4 in the previous DWORD file to 395 and see if that works).
12. Try To Use Some Alternative Tools
I will attempt to make use of some alternative tools. If nothing else has worked, you might try using third-party tools. A Prntsrc tool and a Snippet tool are available. The snippet tool is well-liked. Despite this, the PrntSrc program is incredibly user-friendly and runs well on any machine. TinyPNG and other similar programs are also worth a go. Remove them if you’re already using them.
- Short-cut keys are frequently included with PrntSrc.
- One captures photographs, while the other uploads them to the website for the URL.
- So, make sure it isn’t active by looking for it.
Final Words
Keyboard print screen on dell laptop Button Isn’t Working You now have a comprehensive list of options for fixing the print screen button that isn’t working. You may test this on a variety of devices, such as the Lenovo print screen button that isn’t working. It applies to Lenovo ThinkPads and other models with a broken print screen button. The “insert print screen button not working” is also a problem for certain folks.
This is for the prints or snipper tool. So, have a look at their individual settings. You can also try these steps to fix the problem if the light shot print screen button doesn’t work. Hopefully, the information was useful in assisting you in resolving the difficulties. So, go ahead and permanently fix your print screen key.
Frequently Asked Questions-Print Screen Button Not Working on Windows 10 Laptop
How Do I Get to My Clipboard in Windows 10?
The snapshot will most likely be saved on your Windows clipboard. If you’re using a print screen, use Windows + V to access the clipboard. This will reveal whether you have any print screen or snapshot choices saved.
Why is the Print Screen Button on my Toshiba Laptop not working?
It’s possible that you’re pressing the wrong shortcut key on your Toshiba laptop. You’re most likely using the Windows Logo Key + PrntSrc or the Print Screen Key alone. On a Toshiba laptop, that won’t work. Use the Function + Windows + End Key combination. Check to see if this works. If it doesn’t work, try using Function + Windows + PrtSc Key. In most cases, these options are enough.
How Do I Make Snagit 10’s Print Screen Button Work?
Snagit 10, like Snippet and PrtSc, is a screenshot capture program. You can reinstall it if you’re having issues. It can be replaced with other tools. However, if you enjoy Snagit and need a remedy, attempt the following steps: Go to the Capture Window in the Snagit 10 tool. Go to Files and Capture Preferences in the settings menu. The Hotkeys tab may be found there. The hotkeys are overridden by Snagit. To determine if your Print Screen key works again, check or uncheck these keys.
- The hotkeys can also be assigned here.
- This holds true for a variety of other screenshot and image capture programs.
- As a result, you can experiment with their respective choices in the settings.
How Do I Fix A Dell Laptop’s Print Screen Button That Isn’t Working?
In most cases, the Windows + PrtSc key combination works with Dell laptops. The F-key lock is included with Dell laptops if it isn’t working. It might be on a separate lock or on the function key. As a result, it is worthwhile to investigate. If the approach works without a hitch, you may move on to looking for keyboard drivers. These fixes should work as long as you don’t have any hardware issues. You might try reinstalling the keyboard driver as the last option. Alternatively, you can use the hardware troubleshooter.


Add Comment