
There are two types of people in the world: those who have had a hard drive crash in the past and those who are going to have one. It’s not a matter of if or when your storage device will fail, but when it will. Every storage device, such as a hard drive or an Back In Time (linux software), has a limited lifespan and always fails at the most inconvenient of times.
Accidents are not the only threats; they can include floods, fire, and lightning strikes, as well as erroneous human actions and install back in time linux mint . As a result, we must be aware of these possibilities and be prepared to act by implementing a sound backup plan.I’ll teach you how to backup and restore Back In Time (linux software), a great little application for backing up and restoring system data, in this post.
What exactly is Timeshift and how does it function?
Timeshift is a rudimentary backup tool that comes pre-installed with the Linux Mint operating system from the release of Linux Mint 19. If you’re using the Software Manager, you may quickly install an earlier version of Linux Mint. Timeshift isn’t intended to be utilised in all backup scenarios.
For safeguarding and restoring your unique personal data, such as text documents, spreadsheets, images, and videos, which may be kept on various discs, another backup solution, such as LuckyBackup or Cronopete, is advised. This will be explored at a later time. Back In Time (linux software), on the other hand, is a great way to protect your system installation, including your home folder, because it allows you to restore your complete system if something goes wrong. By the way, Timeshift may be used in any other distribution.
Other Filesystems using Timeshift:
Let’s imagine you didn’t know about Timeshift or that it works best with the BTRFS filesystem when you installed Linux Mint 19. As a result, you installed Linux Mint 19 on filesystems like EXT4. Now that you’ve learned about Timeshift, you’re kicking yourself for not learning about it sooner.
If that’s the case, don’t be concerned. RSYNC is also supported by Back In Time (linux software). RSYNC is also a viable option. The benefit of utilising RSYNC to create backups or snapshots with Timeshift is that it is not dependent on a certain filesystem. Backups or snapshots created by RSYNC can be saved to an external USB hard drive or a USB thumb drive. If something goes wrong, all you have to do is plug in your USB storage device and reinstall your operating system from there. This is the sole purpose of this essay.
Using Timeshift to take snapshots and save them to a USB storage device:
I recommend using a USB 3.0 32 GB USB thumb drive for Timeshift snapshots or backups. Only take Timeshift backups using the USB thumb drive. That manner, no system files will be mistakenly deleted from the USB thumb drive. This is a critical point. By the way, if you like, you may utilise a USB 3.0 external hard drive or SSD. The methods are the same in both cases. I’ll teach you how to make your USB thumb drive ready for Timeshift before I set up Timeshift. Insert your USB storage device first, and Linux Mint should automatically recognise it.
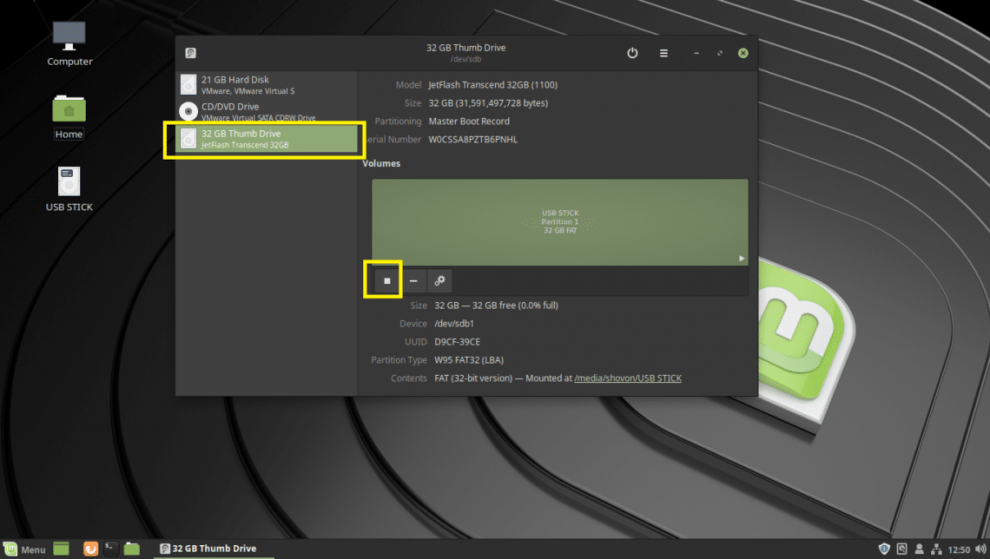
From the Mint Menu, launch the Disks app. Then, under the Disks app, choose your USB Storage device and press the stop button, as seen in the image below. It is necessary to unmount the USB Storage device, Now, as seen in the picture below, click on the Settings button and then on Format Partition. Shift + Ctrl + f is another option. The Format Volume window should be yours. In the Volume Name area, type Timeshift and choose Ext4 as the type, as seen in the image below. When you’re finished, click Next.
Note: I used the Ext4 filesystem format since I didn’t want Windows operating systems to recognise it and destroy my data if it included viruses. I’m just trying to be safe.
- Now choose Format.
- It is necessary to format the USB thumb drive.
- Now, in the Mint Menu, look for timeshift and click it, as seen in the image below.
- Click Authenticate after entering your login user’s password.
If this is your first time running Timeshift, you should see the following Window.You can configure Timeshift from here, but I’ll teach you how to do it via the Timeshift app so you can learn how to alter the configuration as needed. So simply press the Finish button. This is Timeshift’s primary window. Click the Settings button to set up Timeshift. Select RSYNC from the Type tab. Then choose the Location tab.
Select your USB thumb drive from the Location tab. You can control how often a picture is taken from the Schedule tab. To deactivate auto snapshots, uncheck all of the Snapshot Levels. You’ll be able to take photos just when you choose. You may add folders from the Filters tab. The Users tab allows you to include or omit certain directories.
When a snapshot is taken, the omitted folders will not be backed up. As a result, lost files cannot be recovered.
The user’s HOME folders are omitted from the snapshot by default.
When you’re finished, click Close. Your USB thumb drive is now chosen, as you can see. Now, click Make to create a snapshot of your Linux Mint 19 installation. Timeshift should begin taking snapshots right now. If this is the initial Timeshift picture, it will take a long time. A photograph should be taken. You may also leave notes on your photo so that you can remember what it is later.Simply start typing in the comments column of your image. Press Enter> when you’re finished.It’s a good idea to preserve the remark. If your USB storage device has adequate space, you can make as many snapshots as you wish.
Using Timeshift to restore a Snapshot:
I’m going to make some modifications now and then restore to the snapshot I just took. I used sudo apt install apache2 -y to install the Apache 2 web server.As you can see, everything is in working order. Let’s imagine it’s not operating the way you anticipated it to. You’d want to return to the condition you were in before installing this web server. Simply plug in your USB storage device and launch the Timeshift software. Select the snapshot you’d like to restore and click Restore. Next should be selected.
The restoration procedure should now begin. You should be questioned about that. Simply press the Next button. Next should be selected. Your computer should reboot once Timeshift restores the files. As you can see in the image below, there should be no evidence of the Apache 2 web server when your computer boots. That’s how you backup and restore Linux Mint 19 computers from a USB device using Timeshift. Thank you for taking the time to read this article.
Check Also : Install The Lollypop Software Music Player On Ubuntu Linux


Add Comment