

Antimalware Service Executable, or MsMpEng (MsMpEng.exe), is the process that Windows Defender uses to carry out its duties.The term “ecosystem” refers to a group of users who work in the construction industry.
Find out how to repair Windows Defender’s Antimalware Service Executable (MsMpEng.exe), which causes excessive CPU utilisation, and restore your computer’s functionality.
Antimalware Service Executable Repair (MsMpEng)
The antimalware service executable (MsMpEng) is a Windows Defender security process that provides real-time malware prevention.The antimalware service executable Microsoft process, also known as msmpeng.exe, runs in the background and scans files and applications on a regular basis.When a virus or other attack that could be harmful is found by an antimalware service executable, it is deleted or put in a safe place.
Why does the Antimalware Service Executable consume a lot of CPU power?
In order for Windows Defender to continually scan your system for possible threats, the MsMpEng.exe file executes the Microsoft Antimalware Service executable. The Antimalware Service Executable guarantees that Windows Defender delivers real-time defence against computer viruses, malware, and cyber threats while it is running. It is closely related to Windows Defender’s real-time malware and cyberattack defence capability.
Nevertheless, several user complaints on Microsoft support forums have revealed that MsMpEng.exe can occasionally generate disproportionately high CPU and memory consumption.Several customers have also noted that MsMpEng.exe consumes a lot of disc space.
The primary reason that antimalware executables consume so much CPU is that they run in the background all the time to provide:
Complete Scan:
When the computer wakes up or connects to a network, Windows Defender does a comprehensive scan of all files.Excessive CPU usage on your machine may result in frequent stalling, lagging, and delays in access and response.
Real-time protection:
It keeps an eye on programmes and files in the background and takes action when it finds something dangerous.The Windows Defender real-time function continuously checks files, connections, etc. in real-time. This function may deplete the resources of your computer.This is particularly prevalent on low-end PCs.
Moreover, the antimalware service executable consumes excessive CPU time because it examines its own folder – C:Program FilesWindows Defender.
Some possible reasons of the Antimalware Service Executable (MsMpEng) utilising a lot of CPU power include:
- Limited hardware resources; Windows component/software problems;
- Virus or malware infection;
- Windows system files that have been corrupted or misconfigured;
- obsolete Windows Defender definitions;
- Windows Defender’s directory self-scanning feature
Preventing antimalware service executable form searching its own folder is one technique to reduce CPU use.
How to reduce MsMpEng.exe’s CPU consumption in Windows 10
To address the antimalware service executable’s excessive CPU use, use the following alternatives:
The most recent Windows 10 upgrade was used to create our approaches.
Solution #1: Modify the Windows Defender scheduling settings.
Several computer users who report significant CPU utilisation by MsMpEng.exe indicate it happens during a comprehensive system scan.
1. To resolve these difficulties, reschedule the scan for a time when you are not using your computer.
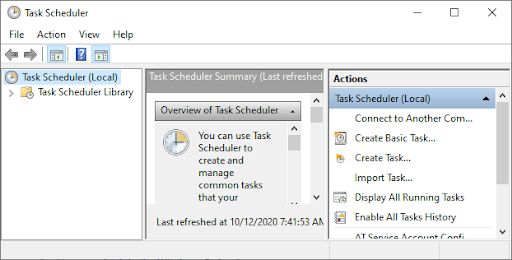
2. Type Task Scheduler into the Windows search field.
3. Go to the left pane of the Task Scheduler screen and double-click Task Scheduler Library.
4. Expand the directories as you traverse the route Library/Microsoft/Windows/Windows Defender.
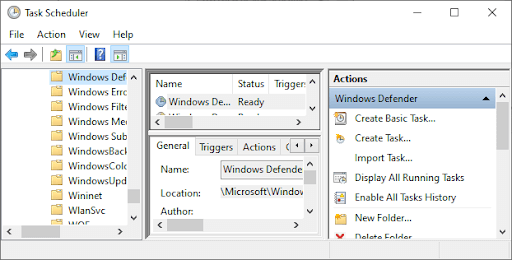
5. Locate Windows Defender Planned Scan in the centre pane of the Windows Defender directory and double-click it.
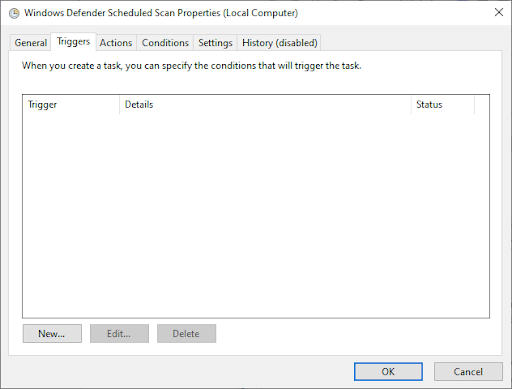
6. Select the Conditions tab in the new Window, then click OK and deselect all items.
This will clear your PC’s scheduled scans.

7. Rescheduled the Windows Defender checks now.
8. Double-click Windows Defender Scheduled Scanning one again.
9. Go to the Triggers tab, then click New.
10. Next, build a new scanning schedule based on your needs, such as weekly or monthly scans, to allow you to balance security with system performance.
11. Now, select the scan date and click OK. Check that the scan is turned on.
12. Resume the previous steps for the remaining three services: Windows Defender Cleaning, Windows Defender Cache Maintenance, and Windows Defender Verification.
This procedure will re-schedule your PC’s Windows Defender to operate according to your preferences. Restart your computer and check to see whether the Antimalware Service Compiled code is still taking a lot of CPU.
Solution #2: Turn off Windows Defender Service
If MsMpEng is still using too much CPU, you might need to turn off the Antimalware Service Executable in Windows 10.Keep in mind that if you don’t have a third-party antivirus programme installed, deactivating Windows Defender may expose you to various cyber-attacks.
When you’re ready, follow the instructions below to completely disable Antimalware Service Executable. To turn off Windows Defender (through the registry editor):
1. To launch the Run Dialog Box, use the Windows Key + R.
2. To launch the Registry Editor, type Regedit and press OK.

Examine the left navigation pane and double-click the folders to go to the following location:
1. HKEY LOCAL MACHINESOFTWAREPolicies stores Microsoft Windows Defender.
2. Find the DisableAntiSpyware > registry item, double-click it, and change the value data to 1.
3. If there is no DisableAntiSpyware registry entry, return to the main Registry Editor pane and right-click on it, then select Create > DWORD (32-bit) Value.
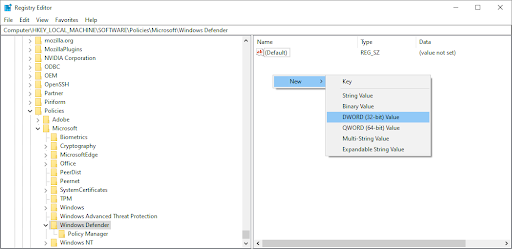
4. Now, rename the new registry item “DisableAntiSpyware,” double-click it, and change the value data to 1.
Let us warn you once more that operating your device without an antivirus programme installed is dangerous. Malware, hackers, and other sorts of cyberattacks may expose you. If you require a free and lightweight solution, we strongly suggest Malwarebytes. Malwarebytes Premium is also available at the best price on the market.
Solution #3: Add selected antimalware service executables to the exclusion list in Windows Defender.
When Windows Defender scans your PC, it analyses all files, including itself, which is a major source of system slowdown. Just adding it to the exclusion list prevents Windows Defender from scanning itself.
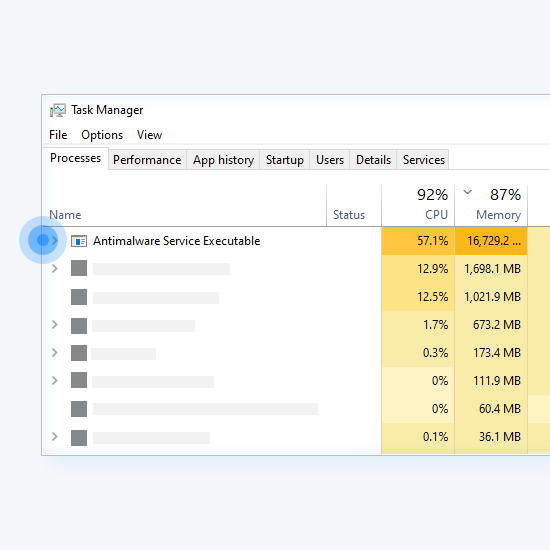
1. Ctrl + Shift + Esc will launch Task Management (or right-click the Taskbar and select Task Manager).
2. Locate the Antimalware Service Executable in the list of objects, then right-click on it and choose Open File Location.
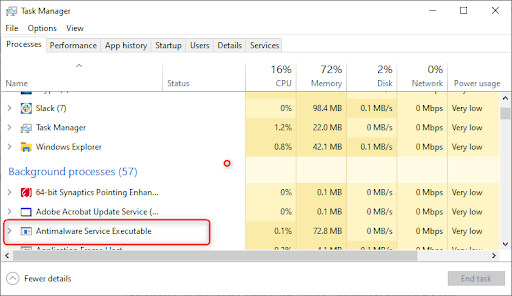
3. In the address bar, paste the complete path of the Antimalware Service Executable.
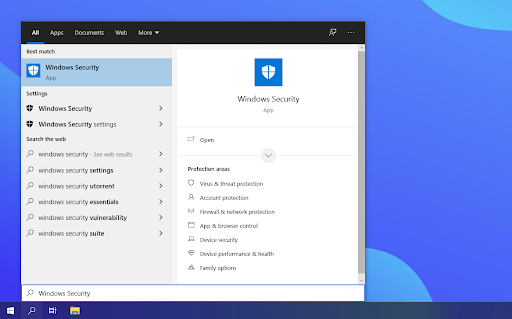
4. To start Windows Defender Security Center, open the Windows Start menu and type “windows defender,” then select the top result.
5. Then, select Virus and Threat Protection > Virus and Threat Protection Settings. Manage settings.
6. Go down to “Exclusions” and click “Add or delete exclusions.”
7. Choose “Add an exclusion,” then “Folder,” and then copy the path to “Antimalware Service Executable (MsMpEng.exe)” from the address bar and paste it into the “Folder” field.
8. Now press the “Open” button.
The Antimalware Service executable folder will be excluded from the scan as a result of this procedure. This solution does not delete the Antimalware Service Executable but rather resolves a known issue with the scans performed by Windows Defender in real-time protection mode.
Solution #4: Run a virus scan on your PC.
We suggest that you run a security scan to make sure that your computer is not infected with malware.Certain malicious programmes and apps may have the ability to increase Windows Defender memory usage.If you notice unusually high CPU and disc usage, you may be the victim of a cyberattack.
We’ll run a system scan using the readily available and built-in Windows Defender.Yet, a more specialised third-party antivirus programme may perform better.To check your computer for malware with Windows Defender, follow these steps:
1. Selecting the magnifying glass icon in your taskbar will bring up the search bar.
2. You may also use the Windows + S keyboard to bring it up.
3. Search for it in Windows Security and open the resulting file.
4. Choose the “Full Scan” option. This will scan every file on your discs to guarantee that no risks may be concealed. Take notice that depending on the number of files on your system, this scan may take up to 2–3 hours.
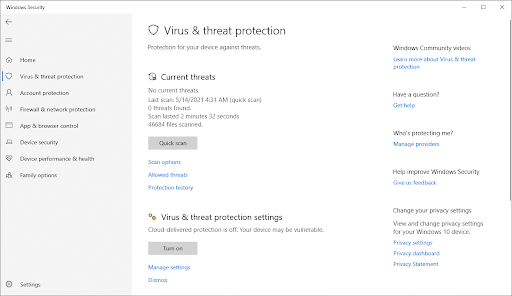
5. To begin the scan, click the Scan Now button. If a danger is found, Windows 10 will quarantine or eliminate it automatically. You may then analyse the scan results to discover which malicious files were eliminated.
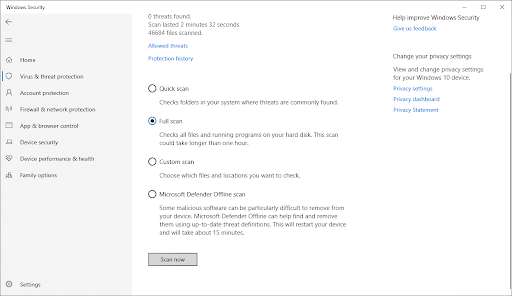
6. Using the home button or the menu inside the left-side pane, navigate to the Antivirus & Threat Prevention tab.
Choose the Scan Options option.
Solution #5 : Revert Windows Defender Definition Updates
In rare circumstances, Windows Defender may get a faulty definition update, resulting in the detection of some Windows 10 files as viruses. If a high number of false positives occur at once, your system may become overburdened. Here’s how to uninstall a poor Windows Defender definition update.
1. By tapping on the magnifying glass icon on your taskbar, you may access the search bar.
You may also use the Windows + S keyboard shortcut to bring it up.
2. In the search box, enter “Command Prompt.” When it appears in the result, right-click it and select “Run as Administrator.”
3. When the User Account Control (UAC) window appears, click Agree to allow the programme to run with administrator privileges.
4. If you need assistance, see our post on How to Make a Local User an Administrator in Windows 10.
5. After the Following Command window is open, type and press Enter to execute the following command: -All “%PROGRAMFILES%Windows Defender” -RemoveDefinitionsMPCMDRUN.exe”
6. Once the first command completes, enter the following and press the Enter key: “%PROGRAMFILES%Windows DefenderMPCMDRUN.exe.” -SignatureUpdate. You can now check to see if the Antimalware Service Executable (MsMpEng.exe)’s excessive CPU usage has been reduced.
Finishing Up
Windows Defender is a very important tool because it comes with your Windows operating system. It may, however, place a strain on your system’s CPU. If you carefully follow the procedures outlined in this article, you will be capable of taking charge of the Antimalware Service Executable on your PC and keeping it working at full speed.
Was this post useful and helpful to you? Please Share this comprehensive guide to all you work with in order to boost your team’s productivity even more. Please get back to our website for additional Microsoft Office bargains as well as more useful tutorials and articles about Microsoft’s most famous office apps.


Add Comment